I recently did a presentation for Network User Group (PA-NUG) and I shared something Ive recently used Netlab hosted on Codespaces to do some testing and validation of Network Configuration. The video is a short demonstration of how I used it to launch a network lab in codespace and run some netlab validation tests for BGP
Author Lou D
Linux Networking IPTABLES

One of the best features of Linux server is IPTables , For Network Engineers who are looking to understand the complexities in technology like eBPF, IPTables is an familiar starting point where the concepts like Packet Handling in the Kernel. I want to outline some details but bring it back to some practical use cases . My goal is to provide some practical iptables use but to also explains the tables in iptables and it actually functions.
IPTables Basics
Lets start with the basics, First of all iptables is a well basically a firewall , it helps control traffic policy across a device. How can I see some basics about iptables ?
| Command | Description |
| iptables -L | List all “Firewall” Filter Rules |
| iptables -L –line-numbers -v | List all Filter rules with line numbers and number of packets that have hit the rule |
| iptables -I INPUT 3 -p icmp -j ACCEPT | Insert Accept ICMP to INPUT Table for rule number 3 |
| iptables -A INPUT -m conntrack –ctstate RELATED,ESTABLISHED -j ACCEPT | append rule to table for all related or established connections |
| iptables -I INPUT 1 -m conntrack –ctstate RELATED,ESTABLISHED -j ACCEPT | same rule only INSERTING it to position 1 of the input table |
| iptables -A INPUT -j LOG –log-prefix “iptables INPUT: ” –log-level 4 | log events in syslog |
| iptables-save | save iptables config changes |
| iptables -t nat -A POSTROUTING -o eth0 -j MASQUERADE | Simple NAT all traffic to eth0s ip address (ideal for public ip) |
| iptables -P INPUT DROP | default deny INPUT |
| iptables -P OUTPUT DROP | default deny OUTPUT |
| iptables -P FORWARD DROP | default deny FORWARD |
Below is an example of the FILTER table and two CHAINS Input and Forward
Chain INPUT (policy ACCEPT 0 packets, 0 bytes)
num   pkts bytes target     prot opt in     out     source               destination
1       30  2000 ACCEPT     all  --  any    any     anywhere             anywhere             ctstate RELATED,ESTABLISHED
2      17M  170G LIBVIRT_INP  all  --  any    any     anywhere             anywhere

Chain FORWARD (policy ACCEPT 0 packets, 0 bytes)
num   pkts bytes target     prot opt in     out     source               destination
1     196K   14M DOCKER-USER  all  --  any    any     anywhere             anywhere
2     196K   12M DOCKER-ISOLATION-STAGE-1  all  --  any    any     anywhere             anywhere
3        0     0 ACCEPT     all  --  any    br-812f849fdf89  anywhere             anywhere             ctstate RELATED,ESTABLISHED
4        0     0 DOCKER     all  --  any    br-812f849fdf89  anywhere             anywhere
5     196K   12M ACCEPT     all  --  br-812f849fdf89 !br-812f849fdf89  anywhere             anywhere
6        0     0 ACCEPT     all  --  br-812f849fdf89 br-812f849fdf89  anywhere             anywhere
7        0     0 ACCEPT     all  --  any    docker0  anywhere             anywhere             ctstate RELATED,ESTABLISHED
8        0     0 DOCKER     all  --  any    docker0  anywhere             anywhere
9        0     0 ACCEPT     all  --  docker0 !docker0  anywhere             anywhere
10       0     0 ACCEPT     all  --  docker0 docker0  anywhere             anywhere
11       0     0 LIBVIRT_FWX  all  --  any    any     anywhere             anywhere
12       0     0 LIBVIRT_FWI  all  --  any    any     anywhere             anywhere
13       0     0 LIBVIRT_FWO  all  --  any    any     anywhere             anywhere
Tables , Chains & Rules

Now There is Multiple tables in IPTables , right so what are they?
The most common is filter since that is responsible for the traditional IP Tuple of Firewall access but there is 5 in total FILTER , NAT , MANGLE , RAW , SECURITY
| Table | Command to view | Description |
| Filter | iptables -t filter -L | Accepts / Rejects Packets |
| NAT | iptables -t nat -L | used to modify the source or destination IP addresses. |
| Mangle | iptables -t mangle -L | can perform general-purpose editing of packet headers, but it is not intended for NAT |
| Raw | iptables -t raw -L | allows for packet mutation before connection tracking and other tables are handled |
| Security | iptables -t security -L | SELinux uses the Security table for packet handling |
Now that we understand there is multiple tables , we need to know about the different chains inside each table. Important is to understand iptables was created jointly with Netfilter. Netfilter is a framework of kernel hooks which allow userspace programs to handle packets on behalf of the kernel. Netfilter has 5 Hooks and those hooks are chains
| Netfilter Hook | Iptables chain | Description |
| NF_IP_PRE_ROUTING | PREROUTING | Triggers when a packer arrives from an external system |
| NF_IP_LOCAL_IN | INPUT | When packet is destined for ip on the machine |
| NF_IP_FORWARD | FORWARD | Packets where src/dst is NOT machine IP. Machine is routing on behalf |
| NF_IP_LOCAL_OUT | OUTPUT | Packet originating from machine leaves |
| NF_IP_POST_ROUTING | POSTROUTING | When ANY packet leaves the machine |
Examples of Packets through tables , chains and rules
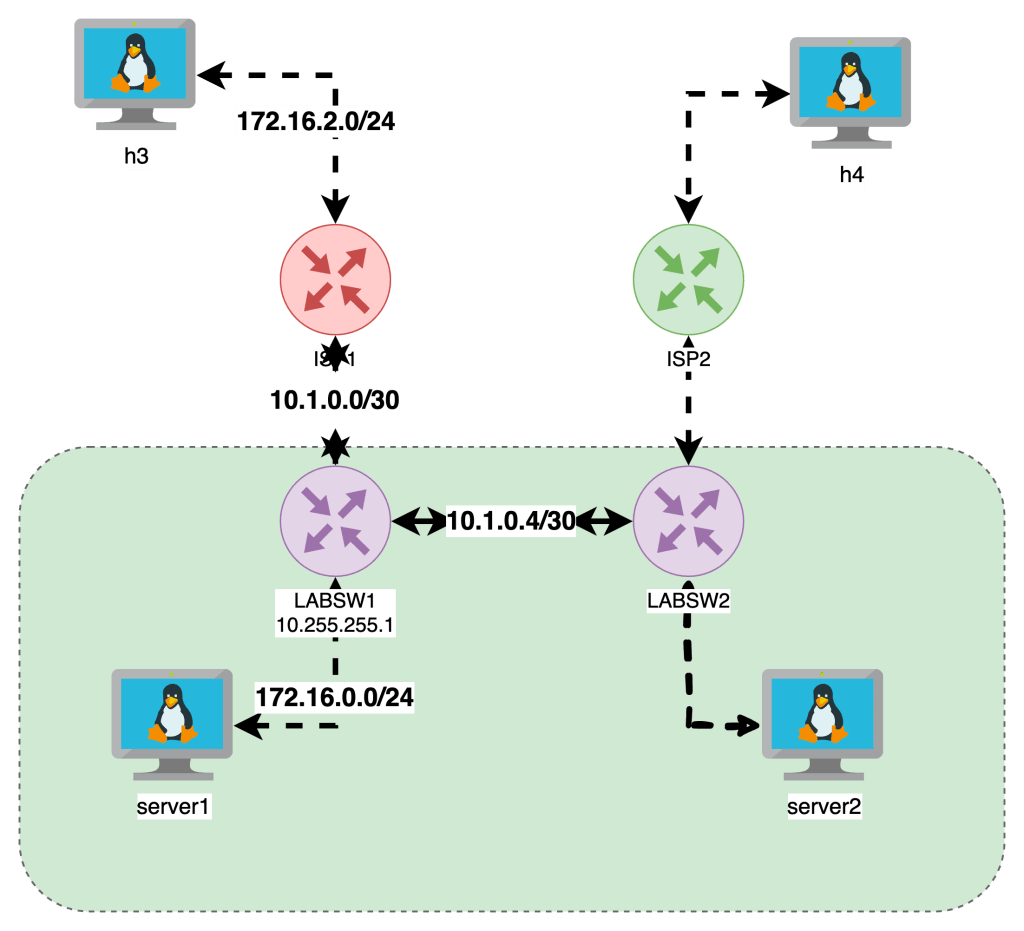
The last idea I want to share is that not every tables has every chain since the purposes vary on the context. Last item is lets look at some examples, lets start with a topology from Netlab We are going to focus on the left side of the diagram Servers H3 and Server1 are running Ubuntu with IPTables enforcement. Devices ISP1 and LABSW1 are running FRR BGP and act as routers in this build
Here is the iptables on server1
server1:/# iptables -L -v --line-numbers
# Warning: iptables-legacy tables present, use iptables-legacy to see them
Chain INPUT (policy DROP 69 packets, 5796 bytes)
num   pkts bytes target     prot opt in     out     source               destination
1     2409 3203K ACCEPT     all  --  any    any     anywhere             anywhere             ctstate RELATED,ESTABLISHED
2        0     0 REJECT     tcp  --  any    any     anywhere             anywhere             state INVALID reject-with icmp-port-unreachable
3        1    84 ACCEPT     icmp --  any    any     anywhere             anywhere
4       75  6268 LOG        all  --  any    any     anywhere             anywhere             LOG level warn prefix "iptables INPUT: "
5       74  6184 LOG        all  --  any    any     anywhere             anywhere             LOG level warn prefix "iptables INPUT: "

Chain FORWARD (policy DROP 0 packets, 0 bytes)
num   pkts bytes target     prot opt in     out     source               destination

Chain OUTPUT (policy DROP 3 packets, 252 bytes)
num   pkts bytes target     prot opt in     out     source               destination
1        9   756 ACCEPT     icmp --  any    any     anywhere             anywhere
The INPUT , NAT & OUTPUT have DENY as the default Rule as well as explicit allow rules for ICMP traffic to allow for this example
Server1 has ip 172.16.0.5 and is pinging across to h3 172.16.2.7. The INPUT table shows packets hit for RELATED and ESTABLISHED as well as the OUTPUT table
This is the basics of iptables and look for my next post that expands on these topics.

Netlab
To be honest , for building labs sucks . If you wanna quickly and cheaply build out multiple node network topology you can follow my quick Deployment section and be running in 10 minutes with Infrastructure as code (IaC). For more details checkout Ivan page – https://netlab.tools/
Key Take Aways with Netlab
- Describe high level topology in a YAML format without specific implementation details
- configure Ip Addressing Schema , routing protocols , VLANS and VRF
- Be up and running with a CLI network topology in minutes
Deployment
- Ubuntu 20.04 in any cloud or vm
Installation
sudo apt-get update && sudo apt-get install -y python3-pip
python3 -m pip install networklab
netlab install -y ubuntu ansible libvirt containerlab

Getting Started
netlab show images
mkdir lab
touch lab/topology.yml


netlab up
netlab connect r1
netlab connect <string>
vtysh
netlab status
netlab restart
cat /etc/frr/daemons
Netlab Examples
If you want to change the provisioning- or device configuration templates, you can:
- Create your own device configuration templates: copy a system device configuration template into templates/module/device.j2 file1 and modify it. You can have custom device configuration templates in the current directory or in the
~/.netlabdirectory. - Create your own device provisioning template: copy a system template into provider/device-domain.j2 file and modify it.
- https://github.com/srl-labs/containerlab
- https://containerlab.dev/
- https://netlab.tools/labs/clab/
- https://netlab.tools/install/ubuntu/
- https://my.ipspace.net/bin/get/NetTools/N2%20-%20What%20Can%20netlab%20Do.mp4?doccode=NetTools
- Running this in an Ubuntu Digital Ocean
- vrnetlab/vr-ftosv
- https://netlab.tools/tutorials/#more-tutorials
- https://netlab.tools/tutorials/#more-tutorials

Topology
| Top Level Element | description | Links |
|---|---|---|
| default | ||
| addressing | ||
| Nodes | Lab Devices can be a string | https://netlab.tools/nodes/ |
| groups | Inventory Groups | https://netlab.tools/groups/ |
| links | define connections between nodes | (https://netlab.tools/links/) |
| module | bgp , ospf , etc | https://netlab.tools/modules/ |
| name | optional used to name linux bridges for vagrant | |
| provider | libvirt , virtualbox , clab , external | physical hardware can be used |
| tools | Third Party tools | https://netlab.tools/extools/ |
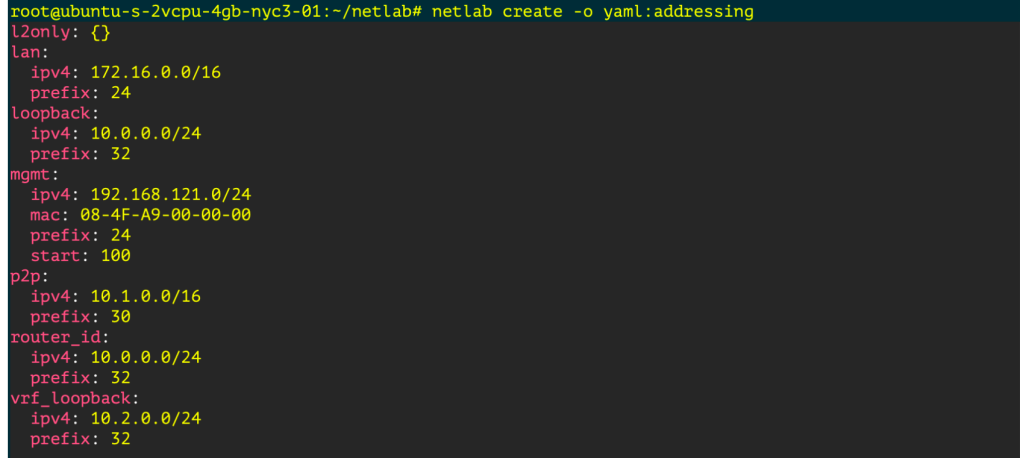
See Addressing Plan
`netlab create -o yaml:addressing`
Monitoring Development Terraform dev
Creating a Graph
pip3 install graphviz
netlab create -o graph:bgp
dot graph.dot -T png -o netsim-graph-bgp.png
Featured

Linux Networking Introduction
One of the more important technical topics I have learned over the last few years is how basic networking functions on traditional linux servers. The goal of this is to provide some basic troubleshooting and system administrator on a Linux System comparable to a Network Engineer.
As a reformed Network Engineer , I find myself working on Linux boxes more often than not , What I am looking to provide here is offering Linux Networking helpful commands and tips from a traditional network engineer.
Its my goal to have this as a series to cover the following practical Linux Networking Topics

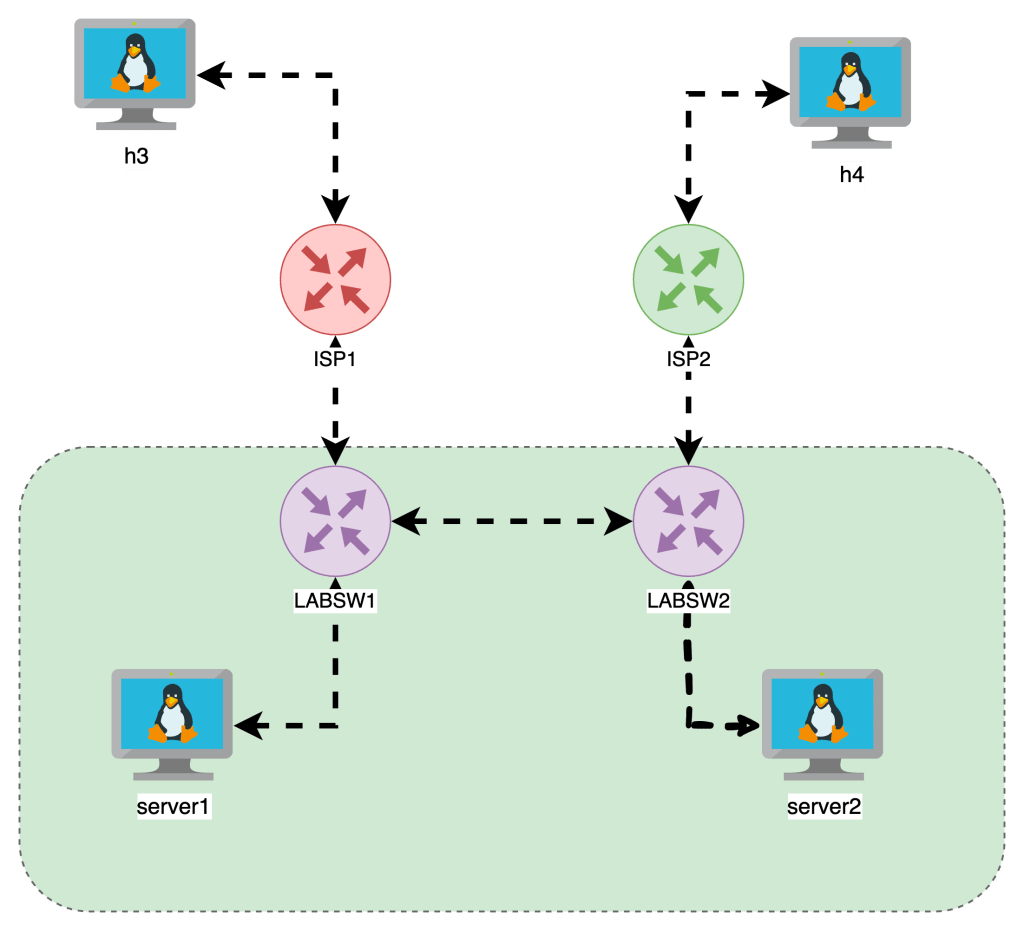
I built this lab our with Netlab and below is a base topology diagrams, one I drew another is from netlabs built in graph feature.
Getting Started
- I built out a topology on Netlab
- The VMs are running Alpine Linux
- FRR is running on the “LABSW” devices
Required library
In order to do the things , we need iproute2 install on our machine , its seems to be standard so you can check or install with the following
- Ubuntu
apt list iproute2apt-get install iproute2
- Alpine
apk list iproute2apk add iproute2
Interface Functions
Often we just wanna add IP Address and interfaces , Check the interfaces running on the box , state and IPs associated
show ip int brief : ip -br a
root@netlab:~# ip -br -c a
lo               UNKNOWN        127.0.0.1/8 ::1/128
eth1             UP             10.108.0.4/20 fe80::bcae:58ff:fe72:e8d5/64
virbr0           DOWN           192.168.122.1/24
virbr0-nic       DOWN
docker0          DOWN           172.17.0.1/16
br-7521756542bb  UP             192.168.121.1/24 fe80::42:f3ff:fe25:7c84/64
Wanna see Interface Physical Errors: ip -s -c -h link
Adding Interfaces and IP Addresses
Adding a Layer 2 Interface
sudo ip link add <BRIDGE_NAME> type bridge
sudo ip link set dev <BRIDGE_NAME> up
Adding a Layer 3 Interface
ip addr add 192.168.114.1/24 dev lo label lo:114
Routing
The difference between a Router and a server is the ability to forward IP packets that are not to the destined interface.
Linux Servers by default do NOT FORWARD traffic to IP Addresses , and like older Cisco switches we need to make sure IP Forwarding is enabled.
Enable Packet Forwarding
When we think about Routing , we need to check if the Linux Kernel is enabled to forward traffic between interfaces. The following commands check if FORWARDING is enabled and how to enable it.
This allows the server to forward traffic that arrives on ONE interface destined for another

In the topology the “LABSW and ISP” devices have FORWARDING enabled.
Routing Tables & Context
Routing in linux is handled by different route tables by default there is LOCAL, MAIN , DEFAULT route tables in linux.
In the image below is a diagram with two route tables , one for LOCAL , another for MAIN. The point is MAIN is the “routing” table which shows how packets will be treated, the LOCAL is the highest priority and lists the local interface IPs and the broadcast domains.
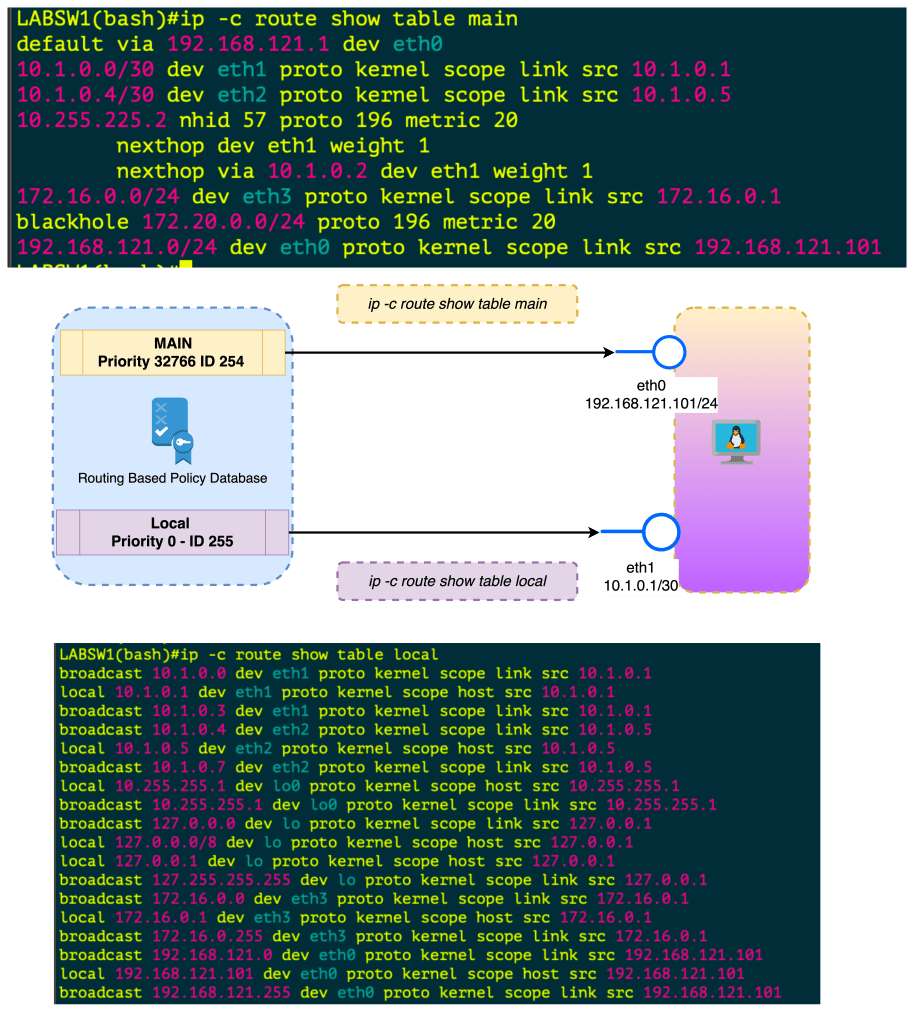
When you create an interface , assign IP Address this is done in the Kernel in the LOCAL routing table. If you want to FORWARD traffic that arrives in one interface over to another interface , this needs to be enabled . Once its enabled this routing is done in the MAIN routing table.
In all reality , you can just check ip route to see the main route table
Policy Based Routing
- ip rule manipulates rules in the routing policy database control the route selection algorithm.
- RPDB Routing Based Policy Database which selects routes based on some set of rules
- Each policy routing rule consists of selector and action predicate
- The RPDB is scanned in order of decreasing priority
- The selector of each rules is applies to { source/destination address , incoming interface , tos and fwmark}
- If selector matches the packet the action is performed
- The action predicate may return with success or failure , if fail it continues RPDB terminated
- The action is selecting the nexthop oputbound interface
- At Startup there is Three Rules or Three Route Tables
| Priority | Selector | Action | Route Table |
|---|---|---|---|
| 0 | match anything | lookup routing table local (ID 255). The local table is a special routing table containing high priority control routes for local and broadcast addresses. | LOCAL ID 255 |
| 32766 | match anything | lookup routing table main (ID 254). The main table is the normal routing table containing all non-policy routes. This rule may be deleted and/or overridden | MAIN ID 254 |
| 32767 | match anything | lookup routing table default (ID 253). The default table is empty. It is reserved for some post-processing if no previous default rules selected the packet. This rule may also be deleted. | DEFAULT ID 253 |
Keys used for hash table lookups during route selection
| route cache | RPDB | route table |
|---|---|---|
| destination | source | destination |
| source | destination | ToS |
| ToS | ToS | scope |
| fwmark | fwmark | oif |
| iif | iif |
The route cache (also the forwarding information base) can be displayed using ip route show cache. The routing policy database (RPDB) can be manipulated with the ip rule utility. Individual route tables can be manipulated and displayed with the ip route command line tool.
Routing Based Policy Database Attributes
Each rule has a pointer to some routing table.
NAT and masquerading rules have an attribute to select new IP address to translate/masquerade.
Besides that, rules have some optional attributes, which routes have, namely realms. These values do not override those contained in the routing tables. They are only used if the route
did not select any attributes.
| Attribute | ||
|---|---|---|
| unicast | the rule returns the route found in the routing table referenced by the rule. | . |
| blackhole | the rule returns the route found in the routing table referenced by the rule. | |
| unreachable | the rule generates a ‘Network is unreachable’ error. | |
| prohibit | the rule generates ‘Communication is administratively prohibited’ error | |
| nat | the rule translates the source address of the IP packet into some other value. |
IP Rule manipulates rules in the routing policy database , the route selection algorithm
Policy based routing
Priorities
SHUT UP AND GIVE ME COMMANDS
| Command | Description | More |
|---|---|---|
sysctl net.ipv4.ip_forward | Checks if router can FORWARD Packets | |
sysctl -w net.ipv4.ip_forward = 1 | Sets FORWARDING for ipv4 | Makes Server a router |
sysctl net.ipv4.route.max_size | Check Routetable Size |  |
| Sets FORWARDING for ipv6 | |
| `ip -c route show table local` | Show the Local Route Table Reflects IPs and Broadcast Addresses on Interfaces , Kernel |  |
| `ip -c route show table main` | Show the Main Route Table also known as `ip route` shows how packets can be routes |  |
| `ip -c route` | ip route | |
ip route add 10.250.7.254/32 dev INTERFACENAME` | Add Static route with interface as the exit |
| Command | ||
|---|---|---|
ip -c neigh | Shows ip neighbors in color |  |
ip -c -br a | Show IPs brief |  |
ip -c -s -h addr | show ip address + stats in color in human readable form |   |
ip -c -s -d tcp_metrics | grep rtt |awk '{print $7 " " $1}' | sort | uniq -c | sort -nr | sort by longest rtt variance and the ip address | |
lsof -i | List open files including network connections | |
ip route show cache | Forwarding Cache | |
ip link add <BRIDGE_NAME> type bridgeip link set dev <BRIDGE_NAME> up | Add Layer 2 Bridge and bring up | |
ip addr add 192.168.114.1/24 dev lo label lo:114 | Add L3 Interfaces Loopback 114 with ip address | |
tc qdisc del dev <intf> root netem loss 10% | add 10% packet loss to interface | |
tc qdisc add dev <intf> root netem delay 200ms | Add 200ms delay to all traffic on interface |
ARIN51
I was fortunate enough to be selected to participate in the ARIN51 fellowship program. Attending the event in Tampa gave me a glimpse of how the policies discussed shape the broader internet. I highly recommend anyone in this field to consider participating in the ARIN community and apply for the fellowship. ARIN 51 discussed a number of draft policy recommendations , service improvements , and community grants initiatives.
Secure Routing
One the key themes of ARIN 51 in my opinion was RPKI. Securing routing is clearly of the most important initiatives. The ROA-Thon hosted by Brad Gorman , The Draft Policy Recommendations ARIN-2021-8 , The Grants Presentation from the DNS Research Federation on the state of RPKI.
Draft Policy Recommendations ARIN-2021-8
This was a Draft Policy Recommendation to remove the ‘Autonomous System Originations’ Field. The OriginAS field has real world use case for organizations that do not use Internet Routing Registries which groups Public Prefixes — ASN under an object name . While most organization are likley using IRR , With removing the OrginAS field and the retirement of the legacy unauthorized ARIN-NONAUTH IRR. The community is driven to making routing more secure and embracing solutions that ensure more accurate , cryptographic secure records.
ROA-THON
The ROA-THON hosted by Brad Gorman, where explained the technical details , benefits and limits of how RPKI can create more secure routing and how the hosted ARIN RPKI product functions today and new features such as certificates never expiring. The key take away from the ROA-THON , lunch tabletop topics and presentation is to at LEAST sign the ROA for the resources, even if your organization is not ready to make decision with RPKI , Signing the routes only benefits and protects the resource holder.
Tech Brief of RPKI
- I recommend reviewing `https://rpki.readthedocs.io/en/latest/` in details for specifics.
- -Great tool `https://irrexplorer.nlnog.net/`
- Resource Public Key Infrastructure – RPKI
- – Route Origin Authorization – ROA
- – Allows Holders of Internet Number Resources to make signed statements about them
- – Third Party resources can download these statements as x509 Certificates
- – These signed certificates assure that a person who administers the Number Resources. Limits attack Surface
- – Does not address Path Validation
- – ROAs allow holders to secure resources so ISPs that make decisions based on RPKI can ensure validity of the ROA
- – Protects against BGP Hijacking
- – Protects against human error , ROA have prefix lengths that can be used to ensure correct advertisements are expected
DNS Research Federation
ARIN provides grants to organization that aim to improve the overall internet. One of the grant recipients was the DNS Research Federation. https://dnsrf.org/. DNSRF was given a grant to evaluate the state of deployment of RPKI in the ARIN region and encourage greater scrutiny over routing and security . The project analyzed the number of RPKIs in use ARIN for ipv4 , ipv6 versus the global deployment. The ARIN region has about 25% of IPv4 covered under RPKLI and ~50% for ipv6.
Number Resource Organization / Address Supporting Organization
One the important items to remember is ARIN is one the five RIRs but works with ICANN. The NRO is the group within that that is part of the ASO group inside of ICANN (confusing yes) but the important item is each RIR allocates members to ASO to work collaboratively on global policy. Kevin Blumberg gave an update presentation on the ASO AC Update. The idea here is that each RIR has to continuously work with the global community on evolving policies.
IPV6
Since ARIN is one the five RIR responsible for administering policy for Numbered Resources , it is in the best interest to move away from the scarcity limitation that ipv4 address space is facing. During ARIN 51 there was a number of success stories of IPV6 deployments including for speakers from Virgnia Tech , AWS and Telus. All of these institutions deployed ipv6 into their networks , Virginia Tech did it 25 years ago !
The mobile carriers of the world are IPV6 .The point is that ipv6 is a real , robust protocol that is becoming superior to *legacy ip*. Albeit some challenges with IPv6 are in the application development space , if an organization treats ipv6 as a requirement
wants to *simplifying* their network (GOODBYE NAT!) . IPv6 is an excellent solution that is not that difficult to deploy considering.
Number Resource Policy Manual & IPv6
One of the more interesting items I discovered is that ARIN in order to facilitate the adoption of IPV6 makes special use cases of IPv4 including micro-allocation to support network infrastructure. Under NRPM section 4.4 this allocation includes space for Internet Peering Exchange points. I found it interesting since this is services like de-cix which I realized when reading the IP Assignments. NRPM Section 4.10 is also another interesting item , under this policy , ARIN set aside a /10 of ipv4 space to promote ipv6
deployments. An applicant must demonstrate an immediate need for a dual stack deployment and never received resources under the policy previously nor have other allocations that will satisfy the need.
– `https://www.arin.net/reference/research/statistics/microallocations/`
ARIN 51
We are so happy you got to be on this Fellowship journey with us. We want to hear all about it! Please submit a 1 page written summary of your experiences from the Fellowship Program and ARIN Meeting ... what you learned, how it compared to your expectations, and how you see yourself engaging with ARIN in the future.
Participating in the fellowship for ARIN 51 was great. An opportunity I nearly missed out on and thankfully did not. I was fortunate enough to be part of the ARIN 50 fellowship but the hybrid experience was far better .
I’ve had dealing with ARIN , assigned new ASNs, SWIP IP Blocks , but those interactions were transactional . The fellowship highlighted the NRPM which CLEARY and literally states the mission of ARIN in section 1.1 (Registration), 1.2(Conservation), 1.3(Routability), 1.4(Stewardship).
The prerequisite video of Jon Worley gave an excellent presentation on the Overview of Internet Number Resource which illustrated Whois , Routing Security , Global Uniqueness , and DNSSEC. Although not exactly new information, revisiting the basics was important to build up to why these ARIN meetings happen at all and the Policy Development Process.
Gaining a new understanding of the mission, the hybrid sessions were absolutely essential to being prepared for the ARIN meeting. Understanding the Policy Development Process , The Recommended Draft Policies and other Working Groups helped understand the structure of the meeting and how it intended to meet its goals.
The policy development process has real world impacts on how ARIN executes its mission which directly impacts the ecosystem of the internet. The goal of the PDP to be technically sound and to gain community support. This type of open source participation allows for the proposed policies to stand on their merits. This is why the email threads for the PDP can be intense. It matters what happens with these policies , impacting people like me who are responsible for handing these resources . Participating is an important part of the process , ARIN openly encourages this.
Attending the event in Tampa far exceeded my expectations truthfully. My expectation was dry non technical policy discussions, but technical interest was engaged in most of the events and the policy was wrapped around in the four key goals of Registration , Conservation , Routability and Stewardship.
Met a number of amazing people, the fellowship team of course but individuals from the community as well.
The lunch table discussion and the ROA-thon was a great learning experience of the importance of using ROAs and the new service ARIN is rolling out. The presentation on IPV6 success stories is another technically sound and enjoyable item. Meeting Matthew , he was a great mentor and I enjoyed a number of discussions with him.
I did walk up to the microphone a number of times during ARIN51 and all my questions were answered and felt part of the process in a meaningful way.
Takeaways
- Sign your ROAs ! lol
- There was one great point made by I believe
Kevin Blumbegwhich is that the email system for ARIN is old , I really hope this is addressed because in my humble opinion this harms the credibility of ARIN with the newer generation of tech. - Slack would be great too ! Imagine the discussions
- The best way I can participate with ARIN in the future is to be engaged. I plan on discussing ARIN fellowship with the NYNOG community to encourage others to participate
- If there is other ways to participate with ARIN I would be interested blog post or some working group perhaps.
- Stewardship and participation is imperative for the network operators. I viewed the interactions with ARIN as transaction prior but there is a real importance to keeping the internet system healthy with the underlying goals. This only helps to ensure there is a healthy public internet in the future.
- ARIN is not just the local RIR for North America , there are working groups that participate at the Global level with other RIRs , ICANN , other Governments to ensure the goals of Registration , Conservation , Routability and Stewardship are met.**
TIL-Vector
Vector is an observability data pipeline that collects , transforms , and routes logs , metrics to any vendor or destination. Vector is open source, cloud native and is the best performing tool in the market.
The various components of Vector allow it to have multiple deployment strategies . Vector can be deployed as an agent and/or aggregator into multiple topologies [ Distributed , Centralized and Stream ] .
Vector components are Sources , Transforms and Sinks.
Vector Source
A source defines where data is ingested from. A source defines where data is pulled from. There is an extensive list of sources including examples AWS , Docker Logs , Server Logs , Server Exec , SNMP , SYSLOG , Apache and Vector.
sources:
  metrics:
    type: host_metrics
    collectors:
      - cpu
      - disk
      - filesystem
      - load
      - host
      - memory
      - network
    scrape_interval_secs: 15

 my_source_id:
    type: exec
Vector Transforms
Transform literally transform the raw data that are transported . This can be parsing , filtering , sampling or tagging. You can transform the data in the pipeline however you see fit. Example from the config.yaml file
transforms:
  get_error_log:
    type: filter
    inputs:
      - vector_error
    condition: |
      contains(string!(.message) , "error")
Vector Sinks
At the end of the pipeline , the information needs to be sent somewhere. The Sink is a destination for the events. The example below will send the errors from the transform set above to a log file. This is a simple implementation and data can be sent to Prometheus , AWS S3 Bucket , Kafka , etc.
sinks:
  errors_to_file:
    type: file
    inputs:
      - get_error_log
    compression: none
    encoding:
      codec: json
    path: /tmp/vector-error-%Y-%m-%d.log
Using Vector in combination with Prometheus / Grafana allows for power distributed monitoring systems.
Links:
https://vector.dev/
If you enjoy , please feel free to subscribe.
TIL-AWS-CLI
Assuming a new role has allowed me to learn more about Public cloud platforms . Specifically AWS , TIL there is a AWS CLI that can be used to interact with the services for the organization.
Install AWSCLI
### CLI Download for MACOS:

curl "https://awscli.amazonaws.com/AWSCLIV2.pkg" -o "AWSCLIV2.pkg"
sudo installer -pkg AWSCLIV2.pkg -target /

### AWSCLIV2.pkg is the name of the file saved on the local machine

### Install the Package
sudo installer -pkg ./AWSCLIV2.pkg -target /

### Confirm Installation
user@ip-172-16-0-179 vector--demo % which aws
/usr/local/bin/aws

### Add directory to $PATH
export PATH=$PATH:/usr/local/bin/aws

### Confirm
user@ip-172-16-0-179 ~ % echo $PATH
/usr/local/bin:/usr/bin:/bin:/usr/sbin:/sbinARIN 50 Fellowship
In the middle of July of 2022, I was scrolling though my gmail account. Reviewing NANOG emails distro when John Curran shared an opportunity to get involved with the community . The fellowship is an opportunity to receive an in depth mentored introduction to ARIN.
ARIN is the American Registry for Internet Numbers. The focus of ARIN is the efficient allocation of resources, educate the community and enhance their services.
Having recently attended an open session for RPKI from ARIN , having a role currently managing ARIN resources, I am eager to learn direct from community member professionals.
Participating in the community has been a personal goal of mine for several years and this fellowship also allows to me to attend virtually ARIN/NANOG 50. This seems to be an opportunity to understand the governance
I am hoping to gain a greater understanding of how to be be more effective with the resource I am responsible for , implement RPKI , and be a more active member of the community at large.
NX-OS Ethanalyzer
Brief Backstory
What attracted me into technology is the problem solving aspect of it. It’s a personal driver that has sustained me in my profession.
Using the proper tools is a great way to help solve a mystery. In this particular instance , my colleague and I were reviewing something simple … The network was not learning any Layer 2 Addressing from the new storage boxes trunked over.
Seems like a really easy item to configure right?
Since the links did show multicast traffic across it and Refusing to give us , I decided to revisit Ethanalyzer
Technical Description
Ethanalyzer is the NX-OS flavor of Tshark , which is the terminal version of Wireshark. Ethanalyzer can capture inband and management traffic and filter packets. What is interesting is you can use both tcpdump or wireshark capture syntax .
Hurry up ! I need to troubleshoot !
Yes , I wrote this because I could not figure out how to filter results quickly.
Filtering packets is where I got stopped briefly because there is
- display-filter
- display-filter == wireshark
- capture-filter
- capture-filter == tcpdump
Wireshark Display Filter
Wireshark / Display Filter

Filter by Port

nxos# ethanalyzer local interface inband display-filter "tcp.port == 179" limit-captured-frames 400
Capturing on inband
2022-08-13 12:44:42.153103    10.1.1.53 -> 10.1.1.52    BGP KEEPALIVE Message
2022-08-13 12:44:42.153116    10.1.2.53 -> 10.1.2.52    BGP KEEPALIVE Message


Filter by MAC Address
```ethanalyzer local interface inband display-filter "eth.addr eq 00:50:56:01:0a:a8" ```

Filter by Vlan ID
``` ethanalyzer local interface inband display-filter "vlan.id eq 3902" limit-captured-frames 400```

- Filter by IP Address
``` ethanalyzer local interface inband display-filter "ip.addr eq 192.168.21.160" limit-captured-frames 400```
TCPDUMP Capture Filter
TCPDUMP / Display Filter
nxos# ethanalyzer local interface inband capture-filter "tcp port 179"
Capturing on inband
2022-08-13 12:46:13.741855    10.1.3.52 -> 10.1.3.53    BGP KEEPALIVE Message
2022-08-13 12:46:13.741916  10.200.0.15 -> 10.200.200.27 BGP KEEPALIVE Message
Capture Output to a file
The display at the end will output the content while capturing
ethanalyzer local interface inband write bootflash:///20220813.pcap display
Capturing on inband
2022-08-13 13:22:27.280908    10.1.1.52 -> 10.1.1.53    BGP KEEPALIVE Message
2022-08-13 13:22:27.280972    10.1.1.53 -> 10.1.1.52    TCP bgp > 55311 [ACK] Seq=1 Ack=20 Win=7280 Len=0 TSV=931077017 TSER=2303421976
Read the output of the pcap
nxos# ethanalyzer local read bootflash:///20220813.pcap
2022-08-13 13:22:27.280908    10.1.1.52 -> 10.1.1.53    BGP KEEPALIVE Message
2022-08-13 13:22:27.280972    10.1.1.53 -> 10.1.1.52    TCP bgp > 55311 [ACK] Seq=1 Ack=20 Win=7280 Len=0 TSV=931077017 TSER=2303421976
2022-08-13 13:22:27.280986  10.200.0.13 -> 10.200.200.27 BGP KEEPALIVE Message
2022-08-13 13:22:27.281002 10.200.200.27 -> 10.200.0.13  TCP 39174 > bgp [ACK] Seq=1 Ack=20 Win=30477 Len=0 TSV=931077017 TSER=2303421976
2022-08-13 13:22:27.343513 00:35:1a:9d:ab:ef -> 01:80:c2:00:00:00 STP RST. Root = 32768/1/00:23:04:ee:be:64  Cost = 0  Port = 0x9063
2022-08-13 13:22:27.343566 00:35:1a:9d:ab:ef -> 01:00:0c:cc:cc:cd STP RST. Root = 32768/1/00:23:04:ee:be:64  Cost = 0  Port = 0x9063
2022-08-13 13:22:27.343601 00:35:1a:9d:ab:ef -> 01:00:0c:cc:cc:cd STP RST. Root = 32768/745/00:23:04:ee:be:64  Cost = 0  Port = 0x9063
2022-08-13 13:22:27.674072    10.1.3.52 -> 10.1.3.53    BGP KEEPALIVE Message
2022-08-13 13:22:27.674138    10.1.3.53 -> 10.1.3.52    TCP bgp > 33813 [ACK] Seq=1 Ack=20 Win=7280 Len=0 TSV=931077135 TSER=2303326167
2022-08-13 13:22:27.674151  10.200.0.15 -> 10.200.200.27 BGP KEEPALIVE Message
Ultimately
The root cause of the issue ended up being a misconfigured route map which prevented traffic between the overlays. While Ethanalyzer did not directly solve the problem , where I found this helpful was in using to troubleshoot connectivity in my new overlay networks.
In my previous experience with Ethanalyzer , I was reluctant to use it because I did not know to filter. Even in one of the Cisco press books .
While using Ethanalyzer, specifying the filters is easier for someone who is familiar with Wireshark filters. The syntax for both the capture filter and the display filter is different. Table 2-1 lists some of the common filters and their syntax with the **capture-filter** and **display-filter** options.
While the author does explain great technical material its the above paragraph that I wish contained the terse point of display-filter == wireshark , capture-filter == tcpdump.
I want to thank Ivan Shirshin who wrote a community blog post in 2013 that made this information clear as day to me. This allowed me to use Ethanalyzer effectively.
Citing my sources / links
- Wireshark Display Filters Man Page
- Cisco Community Post from Ivan Shirshin
- TCPDUMP Man Page
- Cisco NX-OS Troubleshooting
- Cisco Press Books
