I recently did a presentation for Network User Group (PA-NUG) and I shared something Ive recently used Netlab hosted on Codespaces to do some testing and validation of Network Configuration. The video is a short demonstration of how I used it to launch a network lab in codespace and run some netlab validation tests for BGP
Tag Network
Linux Networking IPTABLES

One of the best features of Linux server is IPTables , For Network Engineers who are looking to understand the complexities in technology like eBPF, IPTables is an familiar starting point where the concepts like Packet Handling in the Kernel. I want to outline some details but bring it back to some practical use cases . My goal is to provide some practical iptables use but to also explains the tables in iptables and it actually functions.
IPTables Basics
Lets start with the basics, First of all iptables is a well basically a firewall , it helps control traffic policy across a device. How can I see some basics about iptables ?
| Command | Description |
| iptables -L | List all “Firewall” Filter Rules |
| iptables -L –line-numbers -v | List all Filter rules with line numbers and number of packets that have hit the rule |
| iptables -I INPUT 3 -p icmp -j ACCEPT | Insert Accept ICMP to INPUT Table for rule number 3 |
| iptables -A INPUT -m conntrack –ctstate RELATED,ESTABLISHED -j ACCEPT | append rule to table for all related or established connections |
| iptables -I INPUT 1 -m conntrack –ctstate RELATED,ESTABLISHED -j ACCEPT | same rule only INSERTING it to position 1 of the input table |
| iptables -A INPUT -j LOG –log-prefix “iptables INPUT: ” –log-level 4 | log events in syslog |
| iptables-save | save iptables config changes |
| iptables -t nat -A POSTROUTING -o eth0 -j MASQUERADE | Simple NAT all traffic to eth0s ip address (ideal for public ip) |
| iptables -P INPUT DROP | default deny INPUT |
| iptables -P OUTPUT DROP | default deny OUTPUT |
| iptables -P FORWARD DROP | default deny FORWARD |
Below is an example of the FILTER table and two CHAINS Input and Forward
Chain INPUT (policy ACCEPT 0 packets, 0 bytes)
num   pkts bytes target     prot opt in     out     source               destination
1       30  2000 ACCEPT     all  --  any    any     anywhere             anywhere             ctstate RELATED,ESTABLISHED
2      17M  170G LIBVIRT_INP  all  --  any    any     anywhere             anywhere

Chain FORWARD (policy ACCEPT 0 packets, 0 bytes)
num   pkts bytes target     prot opt in     out     source               destination
1     196K   14M DOCKER-USER  all  --  any    any     anywhere             anywhere
2     196K   12M DOCKER-ISOLATION-STAGE-1  all  --  any    any     anywhere             anywhere
3        0     0 ACCEPT     all  --  any    br-812f849fdf89  anywhere             anywhere             ctstate RELATED,ESTABLISHED
4        0     0 DOCKER     all  --  any    br-812f849fdf89  anywhere             anywhere
5     196K   12M ACCEPT     all  --  br-812f849fdf89 !br-812f849fdf89  anywhere             anywhere
6        0     0 ACCEPT     all  --  br-812f849fdf89 br-812f849fdf89  anywhere             anywhere
7        0     0 ACCEPT     all  --  any    docker0  anywhere             anywhere             ctstate RELATED,ESTABLISHED
8        0     0 DOCKER     all  --  any    docker0  anywhere             anywhere
9        0     0 ACCEPT     all  --  docker0 !docker0  anywhere             anywhere
10       0     0 ACCEPT     all  --  docker0 docker0  anywhere             anywhere
11       0     0 LIBVIRT_FWX  all  --  any    any     anywhere             anywhere
12       0     0 LIBVIRT_FWI  all  --  any    any     anywhere             anywhere
13       0     0 LIBVIRT_FWO  all  --  any    any     anywhere             anywhere
Tables , Chains & Rules

Now There is Multiple tables in IPTables , right so what are they?
The most common is filter since that is responsible for the traditional IP Tuple of Firewall access but there is 5 in total FILTER , NAT , MANGLE , RAW , SECURITY
| Table | Command to view | Description |
| Filter | iptables -t filter -L | Accepts / Rejects Packets |
| NAT | iptables -t nat -L | used to modify the source or destination IP addresses. |
| Mangle | iptables -t mangle -L | can perform general-purpose editing of packet headers, but it is not intended for NAT |
| Raw | iptables -t raw -L | allows for packet mutation before connection tracking and other tables are handled |
| Security | iptables -t security -L | SELinux uses the Security table for packet handling |
Now that we understand there is multiple tables , we need to know about the different chains inside each table. Important is to understand iptables was created jointly with Netfilter. Netfilter is a framework of kernel hooks which allow userspace programs to handle packets on behalf of the kernel. Netfilter has 5 Hooks and those hooks are chains
| Netfilter Hook | Iptables chain | Description |
| NF_IP_PRE_ROUTING | PREROUTING | Triggers when a packer arrives from an external system |
| NF_IP_LOCAL_IN | INPUT | When packet is destined for ip on the machine |
| NF_IP_FORWARD | FORWARD | Packets where src/dst is NOT machine IP. Machine is routing on behalf |
| NF_IP_LOCAL_OUT | OUTPUT | Packet originating from machine leaves |
| NF_IP_POST_ROUTING | POSTROUTING | When ANY packet leaves the machine |
Examples of Packets through tables , chains and rules
The last idea I want to share is that not every tables has every chain since the purposes vary on the context. Last item is lets look at some examples, lets start with a topology from Netlab We are going to focus on the left side of the diagram Servers H3 and Server1 are running Ubuntu with IPTables enforcement. Devices ISP1 and LABSW1 are running FRR BGP and act as routers in this build
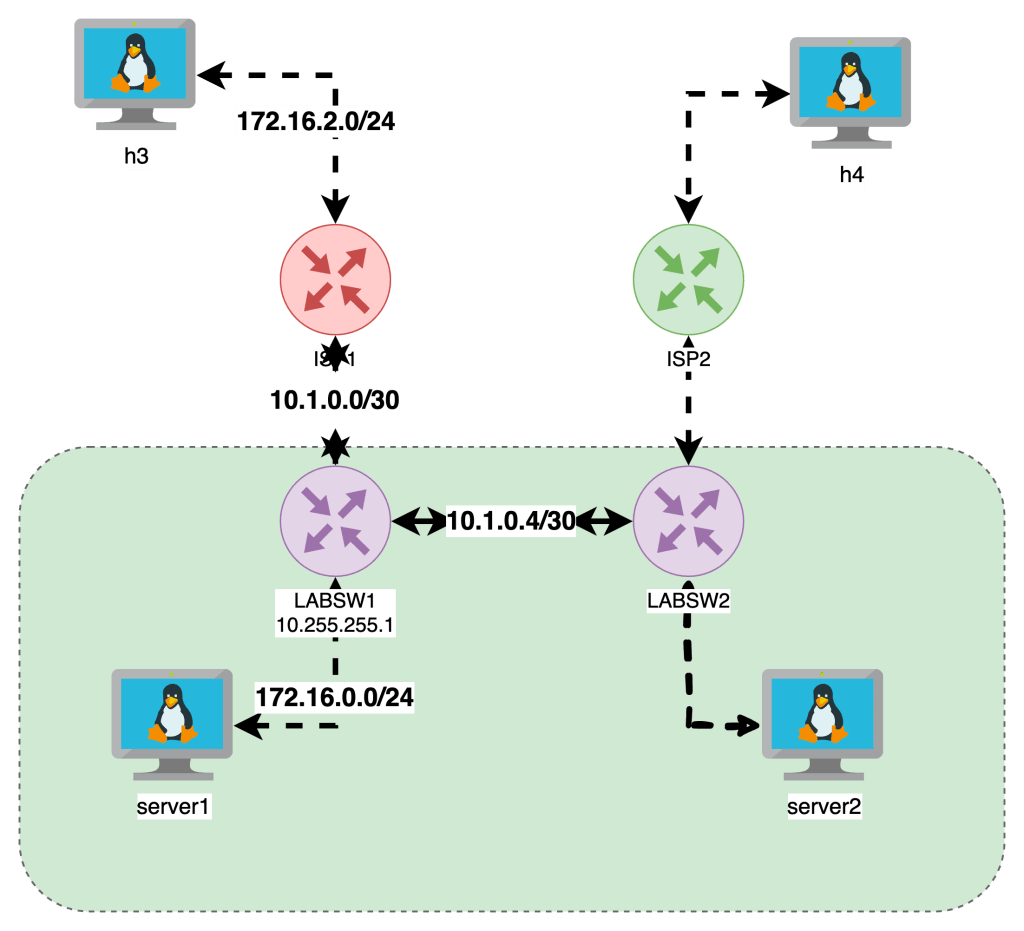
Here is the iptables on server1
server1:/# iptables -L -v --line-numbers
# Warning: iptables-legacy tables present, use iptables-legacy to see them
Chain INPUT (policy DROP 69 packets, 5796 bytes)
num   pkts bytes target     prot opt in     out     source               destination
1     2409 3203K ACCEPT     all  --  any    any     anywhere             anywhere             ctstate RELATED,ESTABLISHED
2        0     0 REJECT     tcp  --  any    any     anywhere             anywhere             state INVALID reject-with icmp-port-unreachable
3        1    84 ACCEPT     icmp --  any    any     anywhere             anywhere
4       75  6268 LOG        all  --  any    any     anywhere             anywhere             LOG level warn prefix "iptables INPUT: "
5       74  6184 LOG        all  --  any    any     anywhere             anywhere             LOG level warn prefix "iptables INPUT: "

Chain FORWARD (policy DROP 0 packets, 0 bytes)
num   pkts bytes target     prot opt in     out     source               destination

Chain OUTPUT (policy DROP 3 packets, 252 bytes)
num   pkts bytes target     prot opt in     out     source               destination
1        9   756 ACCEPT     icmp --  any    any     anywhere             anywhere
The INPUT , NAT & OUTPUT have DENY as the default Rule as well as explicit allow rules for ICMP traffic to allow for this example
Server1 has ip 172.16.0.5 and is pinging across to h3 172.16.2.7. The INPUT table shows packets hit for RELATED and ESTABLISHED as well as the OUTPUT table
This is the basics of iptables and look for my next post that expands on these topics.

Netlab
To be honest , for building labs sucks . If you wanna quickly and cheaply build out multiple node network topology you can follow my quick Deployment section and be running in 10 minutes with Infrastructure as code (IaC). For more details checkout Ivan page – https://netlab.tools/
Key Take Aways with Netlab
- Describe high level topology in a YAML format without specific implementation details
- configure Ip Addressing Schema , routing protocols , VLANS and VRF
- Be up and running with a CLI network topology in minutes
Deployment
- Ubuntu 20.04 in any cloud or vm
Installation
sudo apt-get update && sudo apt-get install -y python3-pip
python3 -m pip install networklab
netlab install -y ubuntu ansible libvirt containerlab

Getting Started
netlab show images
mkdir lab
touch lab/topology.yml


netlab up
netlab connect r1
netlab connect <string>
vtysh
netlab status
netlab restart
cat /etc/frr/daemons
Netlab Examples
If you want to change the provisioning- or device configuration templates, you can:
- Create your own device configuration templates: copy a system device configuration template into templates/module/device.j2 file1 and modify it. You can have custom device configuration templates in the current directory or in the
~/.netlabdirectory. - Create your own device provisioning template: copy a system template into provider/device-domain.j2 file and modify it.
- https://github.com/srl-labs/containerlab
- https://containerlab.dev/
- https://netlab.tools/labs/clab/
- https://netlab.tools/install/ubuntu/
- https://my.ipspace.net/bin/get/NetTools/N2%20-%20What%20Can%20netlab%20Do.mp4?doccode=NetTools
- Running this in an Ubuntu Digital Ocean
- vrnetlab/vr-ftosv
- https://netlab.tools/tutorials/#more-tutorials
- https://netlab.tools/tutorials/#more-tutorials

Topology
| Top Level Element | description | Links |
|---|---|---|
| default | ||
| addressing | ||
| Nodes | Lab Devices can be a string | https://netlab.tools/nodes/ |
| groups | Inventory Groups | https://netlab.tools/groups/ |
| links | define connections between nodes | (https://netlab.tools/links/) |
| module | bgp , ospf , etc | https://netlab.tools/modules/ |
| name | optional used to name linux bridges for vagrant | |
| provider | libvirt , virtualbox , clab , external | physical hardware can be used |
| tools | Third Party tools | https://netlab.tools/extools/ |
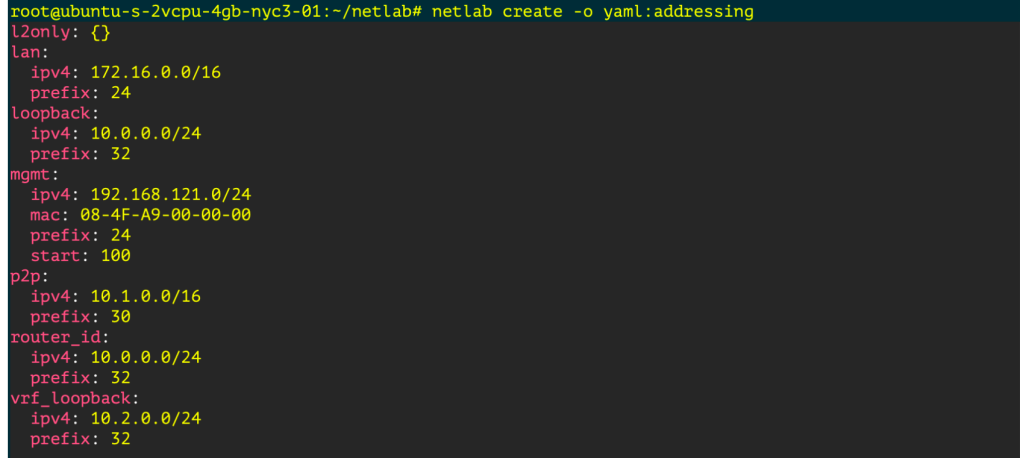
See Addressing Plan
`netlab create -o yaml:addressing`
Monitoring Development Terraform dev
Creating a Graph
pip3 install graphviz
netlab create -o graph:bgp
dot graph.dot -T png -o netsim-graph-bgp.png
Featured

Linux Networking Introduction
One of the more important technical topics I have learned over the last few years is how basic networking functions on traditional linux servers. The goal of this is to provide some basic troubleshooting and system administrator on a Linux System comparable to a Network Engineer.
As a reformed Network Engineer , I find myself working on Linux boxes more often than not , What I am looking to provide here is offering Linux Networking helpful commands and tips from a traditional network engineer.
Its my goal to have this as a series to cover the following practical Linux Networking Topics

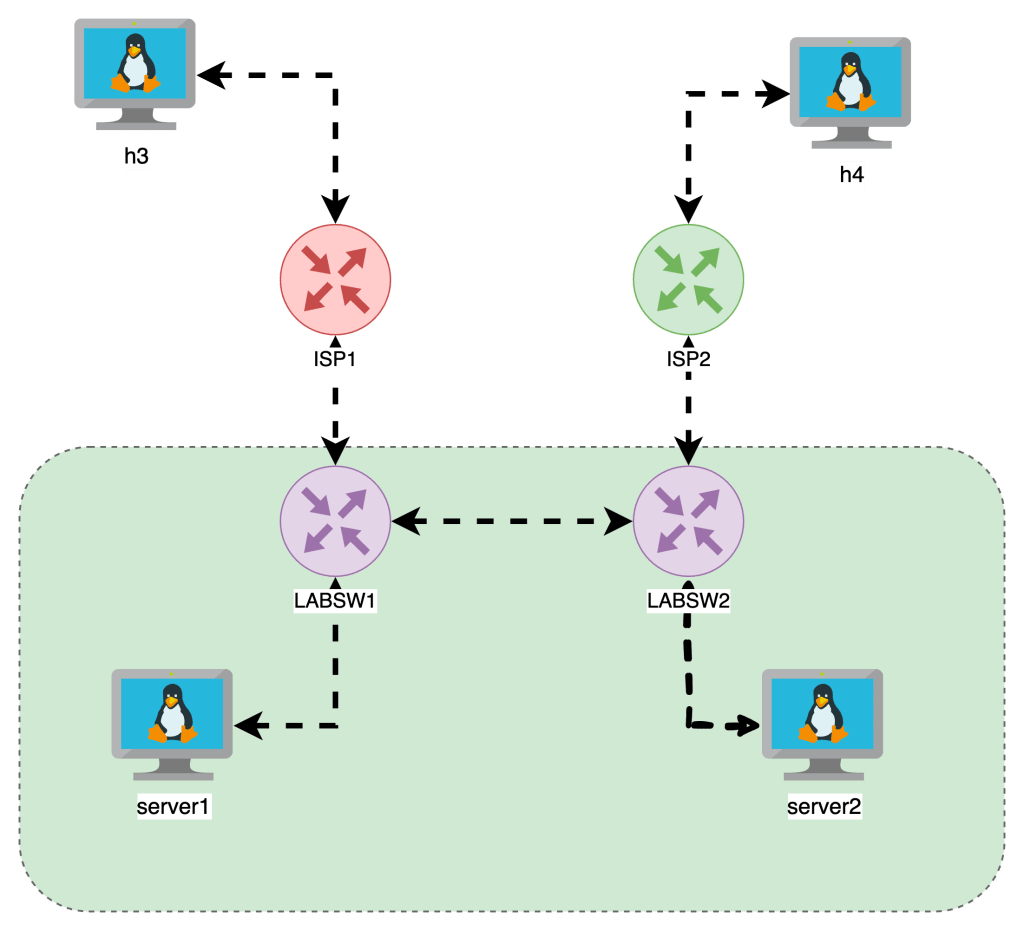
I built this lab our with Netlab and below is a base topology diagrams, one I drew another is from netlabs built in graph feature.
Getting Started
- I built out a topology on Netlab
- The VMs are running Alpine Linux
- FRR is running on the “LABSW” devices
Required library
In order to do the things , we need iproute2 install on our machine , its seems to be standard so you can check or install with the following
- Ubuntu
apt list iproute2apt-get install iproute2
- Alpine
apk list iproute2apk add iproute2
Interface Functions
Often we just wanna add IP Address and interfaces , Check the interfaces running on the box , state and IPs associated
show ip int brief : ip -br a
root@netlab:~# ip -br -c a
lo               UNKNOWN        127.0.0.1/8 ::1/128
eth1             UP             10.108.0.4/20 fe80::bcae:58ff:fe72:e8d5/64
virbr0           DOWN           192.168.122.1/24
virbr0-nic       DOWN
docker0          DOWN           172.17.0.1/16
br-7521756542bb  UP             192.168.121.1/24 fe80::42:f3ff:fe25:7c84/64
Wanna see Interface Physical Errors: ip -s -c -h link
Adding Interfaces and IP Addresses
Adding a Layer 2 Interface
sudo ip link add <BRIDGE_NAME> type bridge
sudo ip link set dev <BRIDGE_NAME> up
Adding a Layer 3 Interface
ip addr add 192.168.114.1/24 dev lo label lo:114
Routing
The difference between a Router and a server is the ability to forward IP packets that are not to the destined interface.
Linux Servers by default do NOT FORWARD traffic to IP Addresses , and like older Cisco switches we need to make sure IP Forwarding is enabled.
Enable Packet Forwarding
When we think about Routing , we need to check if the Linux Kernel is enabled to forward traffic between interfaces. The following commands check if FORWARDING is enabled and how to enable it.
This allows the server to forward traffic that arrives on ONE interface destined for another

In the topology the “LABSW and ISP” devices have FORWARDING enabled.
Routing Tables & Context
Routing in linux is handled by different route tables by default there is LOCAL, MAIN , DEFAULT route tables in linux.
In the image below is a diagram with two route tables , one for LOCAL , another for MAIN. The point is MAIN is the “routing” table which shows how packets will be treated, the LOCAL is the highest priority and lists the local interface IPs and the broadcast domains.
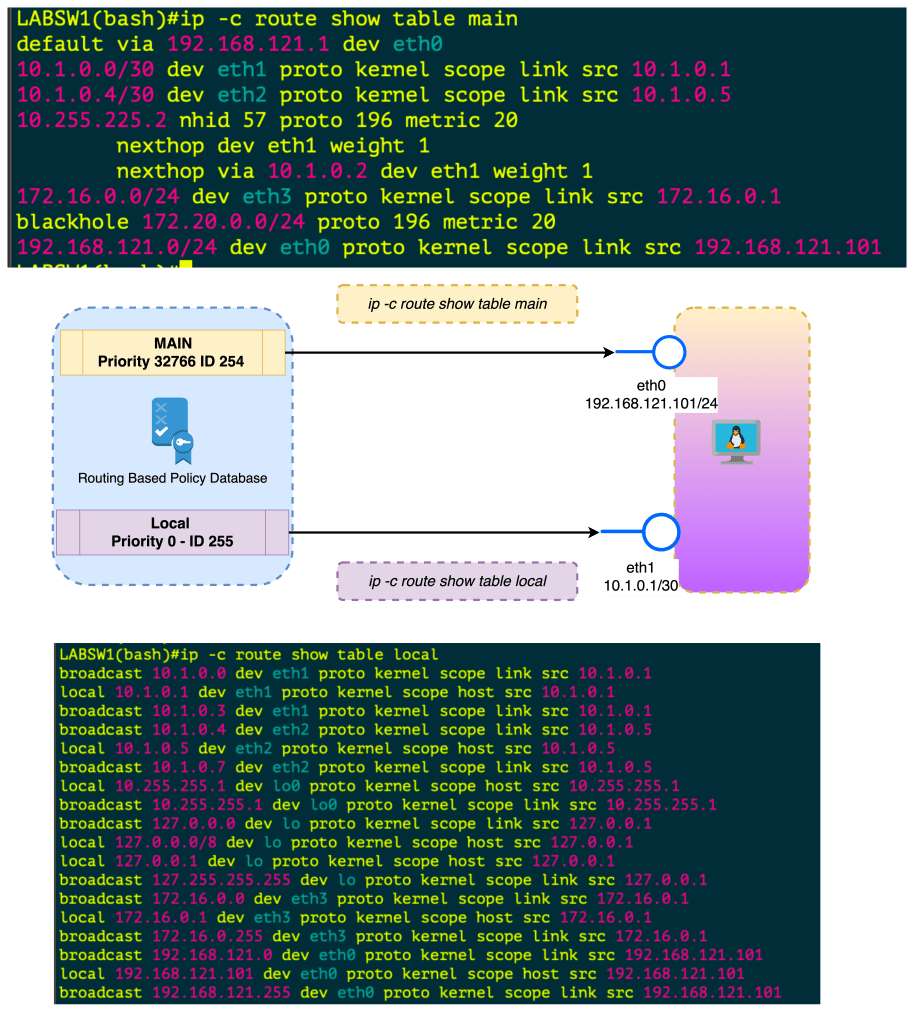
When you create an interface , assign IP Address this is done in the Kernel in the LOCAL routing table. If you want to FORWARD traffic that arrives in one interface over to another interface , this needs to be enabled . Once its enabled this routing is done in the MAIN routing table.
In all reality , you can just check ip route to see the main route table
Policy Based Routing
- ip rule manipulates rules in the routing policy database control the route selection algorithm.
- RPDB Routing Based Policy Database which selects routes based on some set of rules
- Each policy routing rule consists of selector and action predicate
- The RPDB is scanned in order of decreasing priority
- The selector of each rules is applies to { source/destination address , incoming interface , tos and fwmark}
- If selector matches the packet the action is performed
- The action predicate may return with success or failure , if fail it continues RPDB terminated
- The action is selecting the nexthop oputbound interface
- At Startup there is Three Rules or Three Route Tables
| Priority | Selector | Action | Route Table |
|---|---|---|---|
| 0 | match anything | lookup routing table local (ID 255). The local table is a special routing table containing high priority control routes for local and broadcast addresses. | LOCAL ID 255 |
| 32766 | match anything | lookup routing table main (ID 254). The main table is the normal routing table containing all non-policy routes. This rule may be deleted and/or overridden | MAIN ID 254 |
| 32767 | match anything | lookup routing table default (ID 253). The default table is empty. It is reserved for some post-processing if no previous default rules selected the packet. This rule may also be deleted. | DEFAULT ID 253 |
Keys used for hash table lookups during route selection
| route cache | RPDB | route table |
|---|---|---|
| destination | source | destination |
| source | destination | ToS |
| ToS | ToS | scope |
| fwmark | fwmark | oif |
| iif | iif |
The route cache (also the forwarding information base) can be displayed using ip route show cache. The routing policy database (RPDB) can be manipulated with the ip rule utility. Individual route tables can be manipulated and displayed with the ip route command line tool.
Routing Based Policy Database Attributes
Each rule has a pointer to some routing table.
NAT and masquerading rules have an attribute to select new IP address to translate/masquerade.
Besides that, rules have some optional attributes, which routes have, namely realms. These values do not override those contained in the routing tables. They are only used if the route
did not select any attributes.
| Attribute | ||
|---|---|---|
| unicast | the rule returns the route found in the routing table referenced by the rule. | . |
| blackhole | the rule returns the route found in the routing table referenced by the rule. | |
| unreachable | the rule generates a ‘Network is unreachable’ error. | |
| prohibit | the rule generates ‘Communication is administratively prohibited’ error | |
| nat | the rule translates the source address of the IP packet into some other value. |
IP Rule manipulates rules in the routing policy database , the route selection algorithm
Policy based routing
Priorities
SHUT UP AND GIVE ME COMMANDS
| Command | Description | More |
|---|---|---|
sysctl net.ipv4.ip_forward | Checks if router can FORWARD Packets | |
sysctl -w net.ipv4.ip_forward = 1 | Sets FORWARDING for ipv4 | Makes Server a router |
sysctl net.ipv4.route.max_size | Check Routetable Size |  |
| Sets FORWARDING for ipv6 | |
| `ip -c route show table local` | Show the Local Route Table Reflects IPs and Broadcast Addresses on Interfaces , Kernel |  |
| `ip -c route show table main` | Show the Main Route Table also known as `ip route` shows how packets can be routes |  |
| `ip -c route` | ip route | |
ip route add 10.250.7.254/32 dev INTERFACENAME` | Add Static route with interface as the exit |
| Command | ||
|---|---|---|
ip -c neigh | Shows ip neighbors in color |  |
ip -c -br a | Show IPs brief |  |
ip -c -s -h addr | show ip address + stats in color in human readable form |   |
ip -c -s -d tcp_metrics | grep rtt |awk '{print $7 " " $1}' | sort | uniq -c | sort -nr | sort by longest rtt variance and the ip address | |
lsof -i | List open files including network connections | |
ip route show cache | Forwarding Cache | |
ip link add <BRIDGE_NAME> type bridgeip link set dev <BRIDGE_NAME> up | Add Layer 2 Bridge and bring up | |
ip addr add 192.168.114.1/24 dev lo label lo:114 | Add L3 Interfaces Loopback 114 with ip address | |
tc qdisc del dev <intf> root netem loss 10% | add 10% packet loss to interface | |
tc qdisc add dev <intf> root netem delay 200ms | Add 200ms delay to all traffic on interface |
January 10th, 2020
Since my last blog post, I did enjoy the holiday season but have a few items to get caught up on. In this post I discuss hardware upgrades coming up this week, some python scripting for IPAM with a link to a great Netbox resource and some compliments to the guys at https://packetpushers.net/
I also have some upgrades of some Cisco 6500 in my remote data centers. The upgrade is actually a secondary factor. I am swapping 2 x WS-X6704-10GE for WS-X6716-10G-3CXL. The primary motivation is to regain power redundancy since they are running in Combined mode since my power supplies are currently at 1153W each and my system is using 1193 currently. These cards use 300-330W each and the combined unit is rated as using 475W. If I can shave enough off to gain redundancy I will be thrilled or at least I gain some capacity on the switch.
One of my professional goals is to replace the existing IPAM system. I began by moving the Network aggregates into Netbox. The the prefixes along with the associated vlan , customer information , etc. I did write some python scripts to help massage the data for import into Netbox. I wrote a second script to pull the “free” ip subnets available to customer alot of my learning came courtesy of another blogger thank you to Przemek Rogala. My next step is to add the functionality to add new network devices and connections.
I have been consistently studying the CCIE material as well over the last few weeks. It was timely revisit since I ran into a issue with one of my customer recently in regard to a Spanning-Tree issue where I had a 1 gig link being preferred over a 10G link, which initially caught me off guard but I was able to quickly augment the port priority to shift the traffic gracefully to the higher capacity link.
The last item to talk about was the Packetpushers podcast. This week I was invited to their slack channel which is great so far. Interacting with other engineers issues/complaining in real time helps me understand this field in a more personal way. Then Greg , Drew and the guys on the Heavy Networking (Jan 10, 2020) discussed about the important of starting a blog. This gave me the courage to come back and post something today and some of the earlier posts I began with. Highly recommend the whole family of Podcasts at PacketPushers.
I hope to post more early next week perhaps about my studying and some of my other tasks I have at work.
